
How to get the Secret Ending in Black Myth Wukong
Here’s the road to Black Myth Wukong’s Secret Ending, a.k.a. the True Ending
 Image credit: Rock Paper Shotgun/Game Science
 Guide
by
Marloes Valentina Stella
Contributor Published on Sept. 11, 2024 Follow Black Myth: Wukong
Guide
by
Marloes Valentina Stella
Contributor Published on Sept. 11, 2024 Follow Black Myth: Wukong
Are you hoping to get the Secret Ending in Black Myth Wukong? There are two endings in Black Myth Wukong: the "Default Ending" and the "Secret Ending", also known as the "True Ending". Reaching the first is relatively simple (just finish the game), but unlocking the Secret Ending is very difficult, as you'll need to complete hidden parts of the map.
We'll discuss the differences between Black Myth Wukong's Default Ending and Secret Ending below, after which we'll show you how to unlock the Secret Ending. Beware that there will be some spoilers ahead! If you don't want to see them, skip the "What is the Secret Ending?" section and go straight to the "How to get the Secret Ending" part.
What is the Secret Ending?
Simply put, Black Myth Wukong's Secret Ending changes the outcome of the story in a positive way. The Default Ending is generally regarded as the "bad" story outcome in which the protagonist doesn't achieve his special destiny, while the Secret Ending is the "good" outcome where the protagonist reaches true enlightenment. Practically speaking, you get the same start to the final cutscene, but the Secret Ending adds a beautifully animated conclusion that you won't get to see in the Default Ending.
How to get the Secret Ending
To unlock the Secret Ending, you must defeat Black Myth Wukong's Secret Boss, and to unlock this boss fight, you'll have to clear some secret areas and a hidden quest between Chapters 1 to 5 (one secret per Chapter). Here's a brief overview:
- Chapter 1: Clear the Ancient Guanyin Temple secret area
- Chapter 2: Clear the Kingdom of Sahali secret area
- Chapter 3: Complete the treasure hunter side quest
- Chapter 4: Clear the Purple Cloud Mountain secret area
- Chapter 5: Clear the Bishui Cave secret area
- Defeat the secret boss
Be warned, these secrets are pretty hard to discover on your own and take a long time to complete. If you'd like some help, use the walkthroughs below.
Chapter 1 - How to clear the Ancient Guanyin Temple
To unlock the Ancient Guanyin Temple, you must "ring the bells" in Chapter 1. We've got a separate, more detailed guide on how to find the three bells, but in short, here's where they are:
- Bell location 1: Behind the Guangzhi boss, a short walk from the Outside the Forest Shrine.
- Bell location 2: Behind the Guangmou boss in the Bamboo Grove.
- Bell location 3: Next to the Whiteclad Noble boss arena, behind a narrow opening in the wall.
As soon as you've rung the third bell (order doesn't matter), you'll be transported to the Ancient Guanyin Temple secret area, where you must defeat the Elder Jinchi boss. Afterwards, return to the bell near the Whiteclad Noble's arena and interact with the dead fox hanging from the tree. This will complete the side quest.
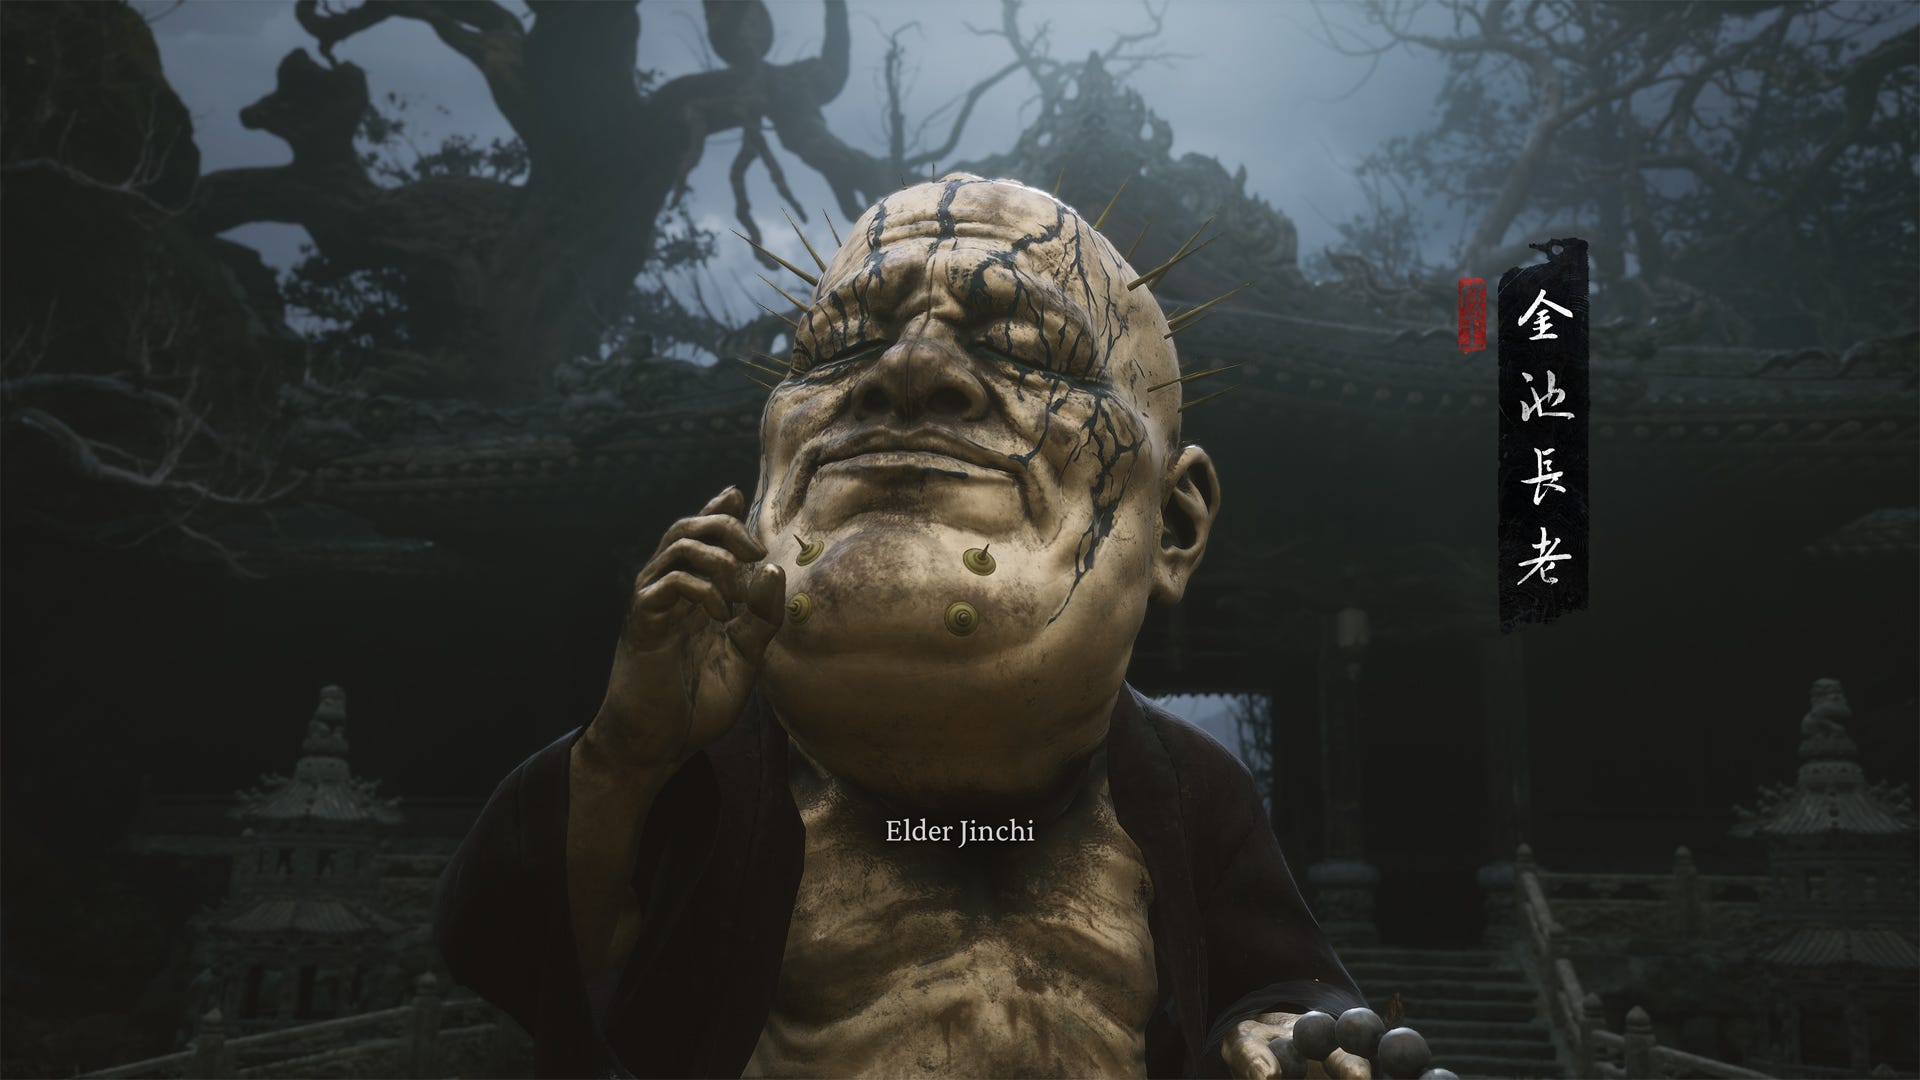 Defeat this golden inhabitant of the Ancient Guanyin temple: the Elder Jinchi boss. |
Image credit: Rock Paper Shotgun/Game Science
Defeat this golden inhabitant of the Ancient Guanyin temple: the Elder Jinchi boss. |
Image credit: Rock Paper Shotgun/Game Science
Chapter 2 - How to clear the Kingdom of Sahali
The Kingdom of Sahali becomes accessible through the "drunken boar" side quest. We've got a detailed drunken boar quest walkthrough you may use, but in short, here's what to do:
- Step 1: Speak with the drunken boar NPC near Rockrest Flat.
- Step 2: Collect a Sobering Stone in the Windrest Hamlet, then return to Rockrest Flat and give it to the drunken boar.
- Step 3: Meet up with the drunken boar at the Crouching Tiger Temple entrance - he's upstairs on the right - and give him some Jade Lotus (buy at a Shrine if you don't have it).
- Step 4: Defeat the First Prince of Flowing Sands to obtain the Arhat Gold Piece.
- Step 5: Return to Rockrest Flat and fight the drunken boar as the Yellow-Robed Squire boss.
- Step 6: Enter the Kingdom of Sahali and defeat the bosses: the Tiger Vanguard and Fuban.
Defeating the Fuban boss in the Kingdom of Sahali will complete the secret area of Chapter 2. You're one step closer to the Secret Ending!
 Defeat this giant dungeater in the Kingdom of Sahali. |
Image credit: Rock Paper Shotgun/Game Science
Defeat this giant dungeater in the Kingdom of Sahali. |
Image credit: Rock Paper Shotgun/Game Science
Chapter 3 - How to complete the treasure hunter quest
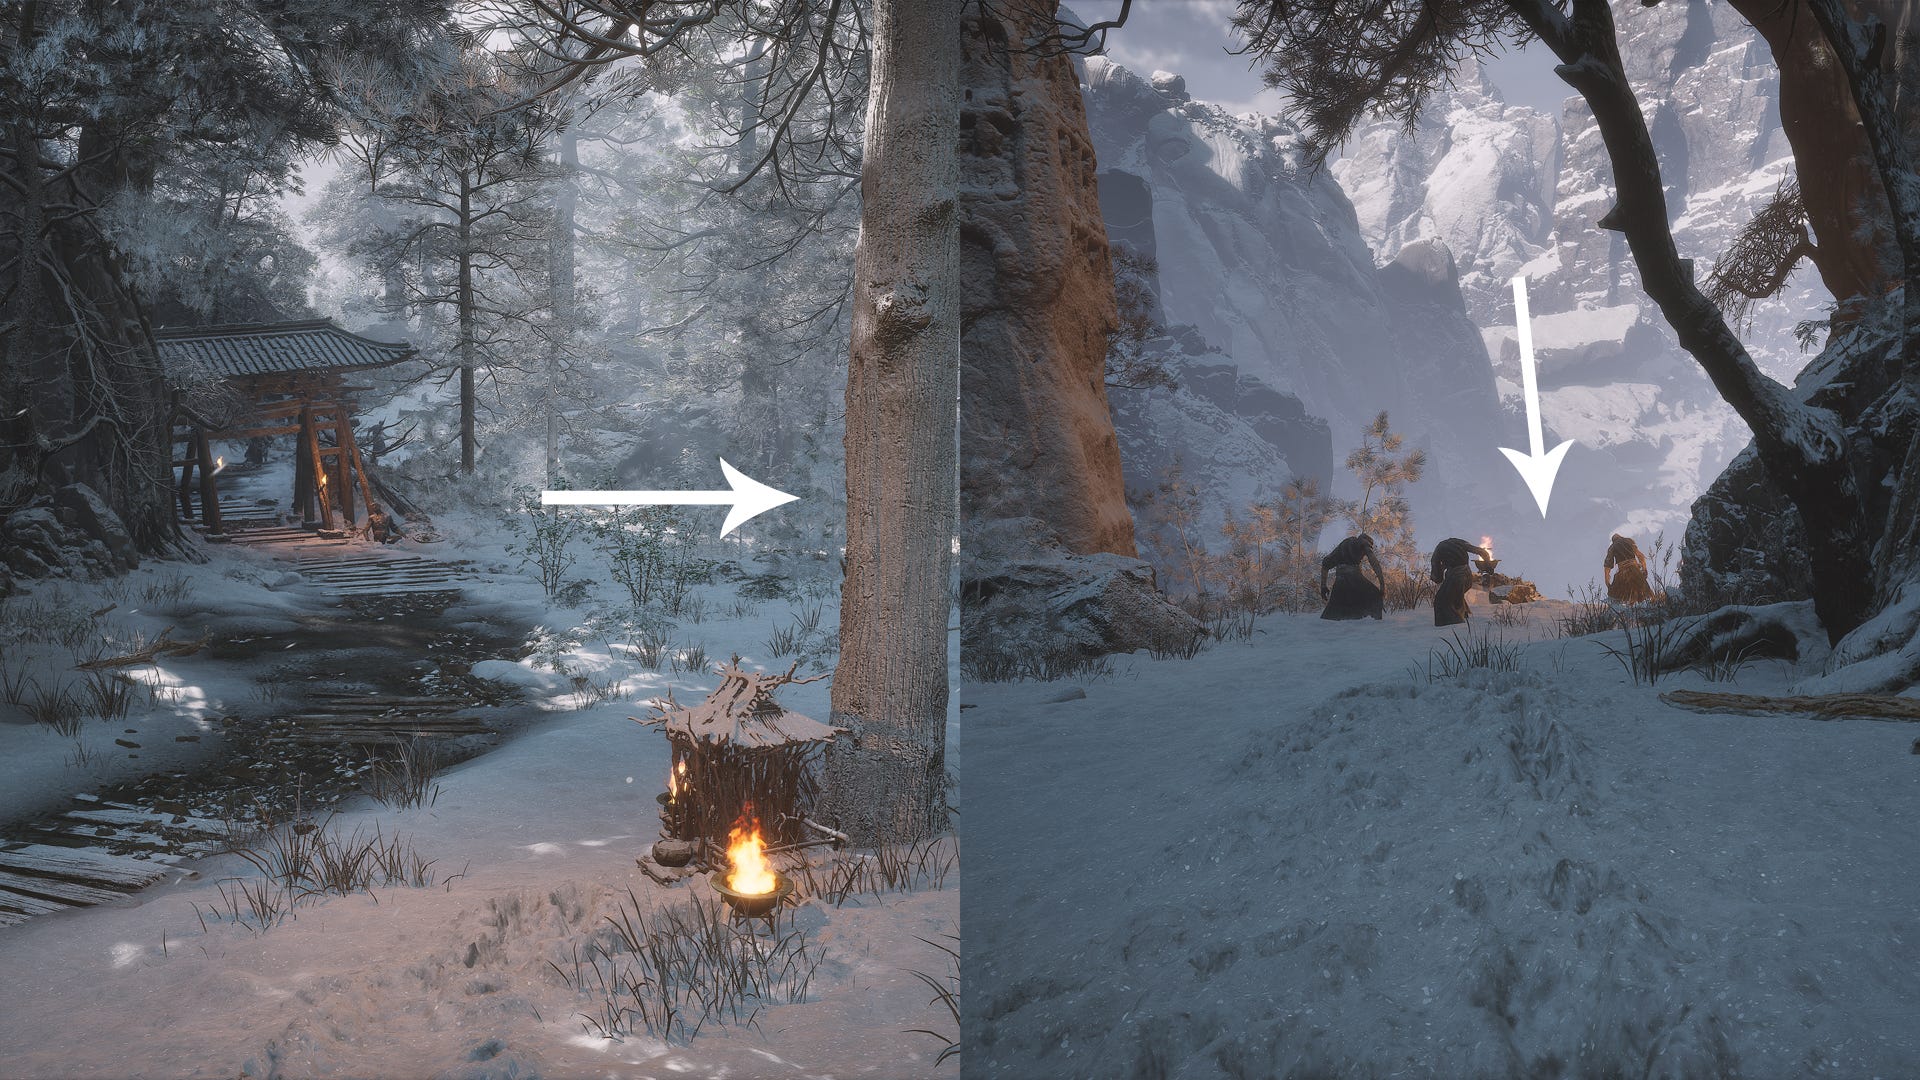
To start the treasure hunter's quest, go to the "North Shore of the Bitter Lake" Keeper's Shrine in the Bitter Lake area. If you turn your back to the Shrine, you can see a path along the shoreline to your right; follow this path until you see an NPC threatened by some enemies in front of you.
 Follow the snowy path and rescue the treasure hunter. |
Image credit: Rock Paper Shotgun/Game Science
Follow the snowy path and rescue the treasure hunter. |
Image credit: Rock Paper Shotgun/Game Science
Knock down the enemies and speak with the NPC, who turns out to be the treasure hunter. Make sure you've exhausted his dialogue, then find him again near the "Towers of Karma" Shrine in the Valley of Ecstasy. He's sitting on the right side of the path ahead of the Shrine (you can follow his voice - he'll be complaining about the cold).
 The treasure hunter is waiting in the Valley of Ecstasy. |
Image credit: Rock Paper Shotgun/Game Science
The treasure hunter is waiting in the Valley of Ecstasy. |
Image credit: Rock Paper Shotgun/Game Science
Equip the Ring of Fire spell and use it in front of the treasure hunter, then talk to him again.
Next, fast-travel to the "Forest of Felicity" Shrine and walk down the hill to your right (turn right before passing through the shrine gate with the dead monk). When you find the road below, turn left and stick to the left. After crossing the small lake, drop down the ledge behind the frozen monks.
 Go off-road and drop down the ledge to reach the Melon Field. |
Image credit: Rock Paper Shotgun/Game Science
Go off-road and drop down the ledge to reach the Melon Field. |
Image credit: Rock Paper Shotgun/Game Science
Keep going down until you reach the "Melon Field" Shrine. Next to this Shrine, you'll find the Green-Capped Martialist's boss arena; defeat this boss to complete the treasure hunter's side quest.
Chapter 4 - How to clear Purple Cloud Mountain
To unlock this secret area, you must defeat the Venom Daoist boss - twice. To find his first location, travel to the "Pool of Shattered Jade" Shrine and go around the corner to the right. After passing through the cocoons, you'll see an old building with a very large, single cocoon in front of it. Hit this "Odd Cocoon" until the Venom Daoist jumps out and defeat him.
 Take this path behind the Pool of Shattered Jade to find the Venom Daoist trapped in a cocoon. |
Image credit: Rock Paper Shotgun/Game Science
Take this path behind the Pool of Shattered Jade to find the Venom Daoist trapped in a cocoon. |
Image credit: Rock Paper Shotgun/Game Science
The next time you'll meet our lovely Daoist is in the Temple of Yellow Flowers, near the "Court of Illumination" Shrine. Pass through the gate in the yellow wall opposite the Shrine (the only exit with a roof) and continue in a straight line ahead. This will lead you outside the temple complex, from where you must follow the path leading up the mountain.
When you reach the highest point, shortly before finding the old shack, you must turn left and drop down the slope; this leads right into the Venom Daoist's lair.
 Walk uphill from the Court of Illumination and plunge into the Venom Daoist's arena. |
Image credit: Rock Paper Shotgun/Game Science
Walk uphill from the Court of Illumination and plunge into the Venom Daoist's arena. |
Image credit: Rock Paper Shotgun/Game Science
After defeating the Venom Daoist, interact with the colourful mural to enter Purple Cloud Mountain.
 This rock art is the doorway to Purple Cloud Mountain. |
Image credit: Rock Paper Shotgun/Game Science
This rock art is the doorway to Purple Cloud Mountain. |
Image credit: Rock Paper Shotgun/Game Science
To clear Purple Cloud Mountain, you just need to fight your way up the mountain and defeat The Duskveil boss at the top. However, if you want the full story and maximum rewards, you should take the following steps:
- Step 1: Speak with the snake on the main path shortly after entering the secret area.
- Step 2: After crossing the bridge, turn right to find the Scorpionlord - destroy some pots to trigger the fight and defeat him.
- Step 3: Speak with Daoist Mi after passing the Petalfall Hamlet Shrine.
- Step 4: Fight yellow-robed monks until you obtain the Violet Hail, then give it to Daoist Mi and defeat him.
- Step 5: Proceed to the Duskveil boss arena.
 Meet the Snake, Scorpionlord, and Daoist Mi to get the full Purple Cloud Mountain experience before fighting The Duskveil. |
Image credit: Rock Paper Shotgun/Game Science
Meet the Snake, Scorpionlord, and Daoist Mi to get the full Purple Cloud Mountain experience before fighting The Duskveil. |
Image credit: Rock Paper Shotgun/Game Science
Chapter 5 - How to clear Bishui Cave
To enter Bishui Cave, you must do the Pale-Axe Stalwart quest. Here's an overview of all the steps involved:
- Step 1: Enter the village with the fighting enemies just beyond the "Ashen Pass I" Shrine and defeat the large axe-wielding bull, then speak to him. He'll introduce himself as the Pale-Axe Stalwart.
- Step 2: Continue the main path until you reach "Ashen Pass II" (defeat the Brown-Iron and Gray-Bronze Carts blocking the way), then return to the village to speak with the Pale-Axe Stalwart again.
- Step 3: Continue the main path and defeat the Crimson-Silver Cart.
- Step 4: From the Fallen Furnace Crater, walk back the way you came. Remember the none-too-friendly boulder constantly trying to crush you? It destroyed a barrier on the left side of the path, allowing you to walk down and reach the "Cooling Slope" Shrine. Continue past this Shrine and fight the Rusty-Gold Cart.
- Step 5: Speak with Pale-Axe Stalwart and enter Bishui Cave through the large door behind the Rusty-Gold Cart's arena.
To clear Bishui Cave, you must defeat the Top Takes Bottom, Bottom Takes Top boss as well as the Bishui Golden-Eyed Beast. They're on the main path, you won't miss them.
 That's our friend Pale-Axe Stalwart on the left, and the entrance to Bishui Cave (seal already removed) on the right. |
Image credit: Rock Paper Shotgun/Game Science
That's our friend Pale-Axe Stalwart on the left, and the entrance to Bishui Cave (seal already removed) on the right. |
Image credit: Rock Paper Shotgun/Game Science
How to find the Secret Boss
Did you complete every secret in Chapter 1 to 5? Congratulations; nothing stands between you and Black Myth Wukong's secret ending! Well, nothing except the Secret Boss, whom you must defeat before you finish Chapter 6.
To find the Secret Boss, fast-travel to the "Great Pagoda" Shrine. If you haven't been there yet, go to the "Snow-Veiled Trail" in the Pagoda Realm (Chapter 3), head around the corner to the right, cross the suspension bridge, and go up the large slope to the left.
 This way to the Great Pagoda. |
Image credit: Rock Paper Shotgun/Game Science
This way to the Great Pagoda. |
Image credit: Rock Paper Shotgun/Game Science
Walk to the highest part of the room behind the Great Pagoda Shrine to trigger a cutscene - remember: nothing will happen until you complete the Chapter 1-5 secrets listed above. Following this cutscene, you'll be transported to the Mount Mei secret area, where you must follow the path to the top of the mountain to fight the Secret Boss: Erlang. Beware that this is a rather lengthy boss fight with three different phases.
To help you defeat Erlang, here are some combat tips:
- Erlang uses fast, high-range attacks, so be ready to dodge! Lookout for the cues: when Erlang jumps up and his spear flashes yellow, when he starts to spin, and when he briefly pauses his movement, you'll know an attack is incoming.
- If you need to use your Gourd, create some distance between you and Erlang - he won't immediately chase you.
- After depleting roughly 25% of Erlang's HP, he'll fly up and throw a massive axe at you. It circles around as it comes down, so wait for the blade to come closer before you dodge. You must dodge Erlang's next attack immediately afterwards.
- With roughly 50% HP left, Erlang will try to laser you, but you can dodge through the lasers or outrun them.
- Beware of the red-lightning smash attack immediately after. Erlang will remain airborne as he gathers energy, then smash down to your position. This will certainly hurt if he lands it, but you can use Cloudstep to easily avoid damage.
- Whenever Erlang finishes his "major" attacks, especially the red lightning one, he'll remain immobile for a short while, so these are great opportunities to attack!
 Spear attack incoming! |
Image credit: Rock Paper Shotgun/Game Science
Spear attack incoming! |
Image credit: Rock Paper Shotgun/Game Science
Following the Erlang boss fight, you will turn into a huge monkey. You must fight the Four Heavenly Kings first, then battle Erlang in lion form after. Compared to the previous one, this boss fight isn't very challenging at all; using a limited moveset (with only Rock Solid as a spell), just target the Heavenly Kings one-by-one to defeat them.
 The bad news: after defeating Erlang, you'll have to fight these guys. The good news: they're no match for the giant monkey. |
Image credit: Rock Paper Shotgun/Game Science
The bad news: after defeating Erlang, you'll have to fight these guys. The good news: they're no match for the giant monkey. |
Image credit: Rock Paper Shotgun/Game Science
After you've won the fight, you'll return to the Great Pagoda. Simply continue the game as you normally would, and when you reach the final scene, you'll get the True Ending.
That's everything you need to know about the Secret Ending in Black Myth Wukong. Before you finish the game though, take a look at our Keeper's Shrine locations guide and our full list of bosses to make sure you haven't missed anything. If Erlang is giving you trouble, get some extra Sparks from the hidden meditation spots and find the best Stance for your playstyle.


